勤務表などの月間スケジュールをVBAで作成します。
まずは定型であるカレンダーの枠組みを作りましょう。
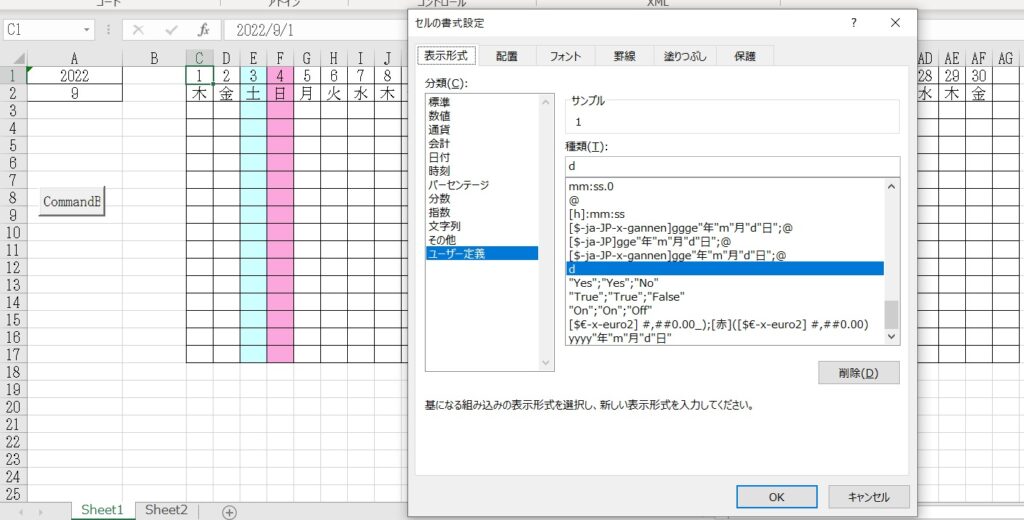
A1セルに年、A2セルに月を入れます。

VBAの作成です。とりあえずSheet1シートに「開発」から「挿入」でコマンドボタン(ActiveX コントロール)を
作成します。上記画面ではA8セルにあるのがそれです。
Sheet1のコード表示を開いて
Private Sub CommandButton1_Click()
End Sub
ないに記述していきます。
‘カレンダー内の削除
Range(“C1:AG17”).Value = “”
Range(“C1:AG17”).Interior.ColorIndex = 0
スケジュール表内の文字や背景色をキレにします。
‘指定年月を取得する
iYear = Cells(1, 1)
iMonth = Cells(2, 1)
‘月末を取得する
Getumatu = DateAdd(“d”, -1, DateAdd(“m”, 1, CDate(iYear & “/” & iMonth & “/1”)))
Matubi = Day(Getumatu)
A1セルの年とA2セルの月の値を変数に代入します。
DateAddで月末の年月日をGetumatuに代入します。
Dayで日付の30とか31とかを出しています。
‘カレンダーの曜日と日付を入力する
For i = 1 To Matubi
strDay = iYear & “/” & iMonth & “/” & i
Cells(2, 2 + i).Value = Format(CDate(strDay), “aaa”)
Cells(1, 2 + i).Value = strDay
Cells(1, 2 + i).NumberFormatLocal = “d”
Range(Cells(3, 2 + i), Cells(5, 2 + i)).Merg
For j = 2 To 17
If CDate(strDay) = CDate(Worksheets(“Sheet2”).Cells(1 + j, 2)) Then
Cells(3, 2 + i).Value = Worksheets(“Sheet2”).Cells(1 + j, 4)
‘縦書き
Cells(3, 2 + i).Orientation = xlVertical
‘上揃え
Cells(3, 2 + i).VerticalAlignment = xlTop
‘フォントサイズ指定
‘Cells(3, 2 + i).font.Size = 12
End If
Next
Next
カレンダーの日付と曜日を入力していきます。
日付は「2021/11/11」のような形式になっているので「d」の
表示形式を作成して日付のみ表示するように設定をするようなVBAです。
ここからは2種類のやり方があります。
一つは、「条件付き書式」で背景色を設定する方法ともう一つは直に背景色を入れる方式です。
それぞれのメリット・デメリット
条件付き書式
・土日スケジュールの欄にコピペをしても土日などの背景色が一緒にコピペされない
・条件付き書式が無限に増殖する可能性がある(結果エクセルが重くなる)
直に背景色を入れる
・土日のスケジュールをコピペすると背景色も一緒にコピペされてしまう
※コピペの条件を選べばいいのだが、手間が増える
・ただ色を塗っているだけなので軽い
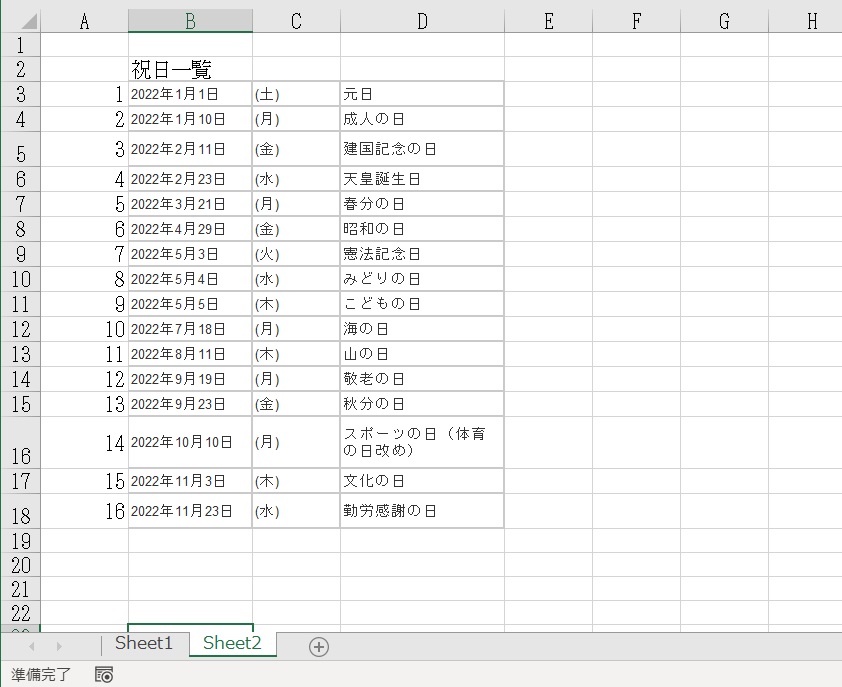
祝日は「Sheet2」に配置する
直に背景色を入れる
‘土・日の背景色を設定する
For i = 1 To Matubi
If Cells(2, 2 + i).Value = “土” Then
Range(Cells(1, 2 + i), Cells(17, 2 + i)).Interior.Color = 16777164
ElseIf Cells(2, 2 + i).Value = “日” Then
Range(Cells(1, 2 + i), Cells(17, 2 + i)).Interior.Color = 14526459
Else
‘なにもしない
End If
‘祝日の背景色を設定する
For j = 3 To 18
If CDate(iYear & “/” & iMonth & “/” & i) = CDate(Worksheets(“Sheet2”).Cells(j, 2)) Then
Range(Cells(1, 2 + i), Cells(17, 2 + i)).Interior.Color = 14526459
Exit For
End If
Range(Cells(3, 2 + i), Cells(5, 2 + i)).Merge
If CDate(strDay) = CDate(Worksheets(“Sheet2”).Cells(1 + j, 2)) Then
Cells(3, 2 + i).Value = Worksheets(“Sheet2”).Cells(1 + j, 4)
‘縦書き
Cells(3, 2 + i).Orientation = xlVertical
‘上揃え
Cells(3, 2 + i).VerticalAlignment = xlTop
‘フォントサイズ指定
‘Cells(3, 2 + i).font.Size = 12
End If
Next
Next
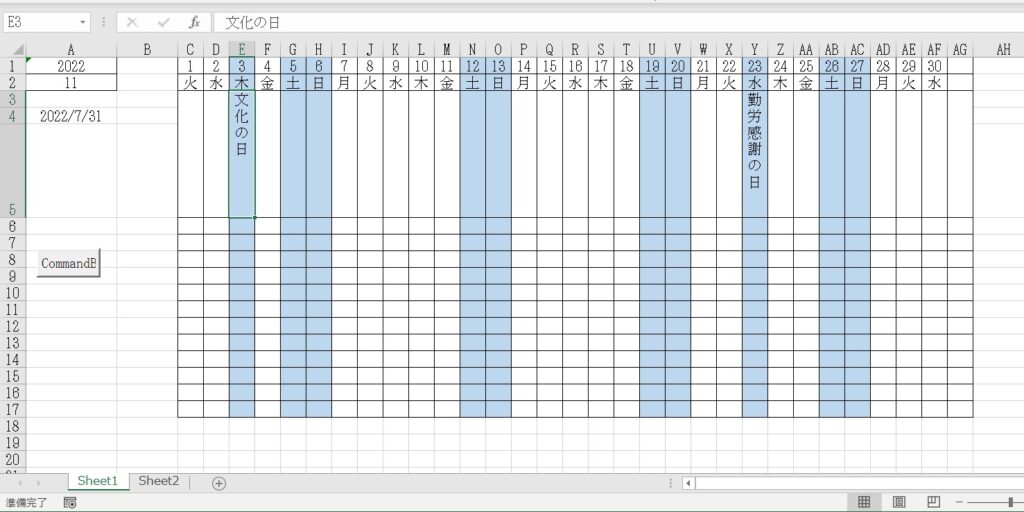
横方向に曜日を見ていき、土日に該当すれば列の背景に色を付けます。
祝日については横方向に曜日を見ていくループ内にSheet2に該当する祝日の日付と同じか?
を確認し、一致するなら列に背景色を付けます。
その下の行は祝日内容欄の3行を結合して祝日内容を入れます。
しっかり対処すれば「条件付き書式」の方が都合が良さそうです。
条件付き書式で背景色を入れる
‘条件付き書式を全て消去
Cells.FormatConditions.Delete
Range(Cells(1, 3), Cells(17, 33)).FormatConditions.Add Type:=xlExpression, Formula1:= _
“=OR(C$2=””土””,C$2=””日””,C$1=Sheet2!$B$3,C$1=Sheet2!$B$4,C$1=Sheet2!$B$5,” & _
“C$1=Sheet2!$B$6,C$1=Sheet2!$B$7,C$1=Sheet2!$B$8,C$1=Sheet2!$B$9,C$1=Sheet2!$B$10,” & _
“C$1=Sheet2!$B$11,C$1=Sheet2!$B$12,C$1=Sheet2!$B$13,C$1=Sheet2!$B$14,C$1=Sheet2!$B$15,” & _
“C$1=Sheet2!$B$16,C$1=Sheet2!$B$17,C$1=Sheet2!$B$18)”
With Range(Cells( 1,3), Cells(17,33)).FormatConditions(1).Interior
.PatternColorIndex = xlAutomatic
.ThemeColor = xlThemeColorAccent5
.TintAndShade = 0.599963377788629
End With
Range(Cells( 1,3), Cells(17,33)).FormatConditions(1).StopIfTrue = False
最初に余計な条件付き書式が残っている可能性があるので、全ての条件付き書式を削除します。
マクロ作成で記述の体裁を作ったので余計な記述があるかもしれません。
C$2は$をつけることで2の行のみを固定して最後の日付まで土日及び祝日に該当すると背景色を付けます。
最後のStopIfTrueの所はいらないと思います。
全体のプログラムです。
Private Sub CommandButton1_Click()

Dim i As Integer
Dim j As Integer
Dim iYear As Integer
Dim iMonth As Integer
Dim Getumatu As Date
Dim Matubi As Integer
Dim strDay As String

'カレンダー内の削除
Range("C1:AG17").Value = ""
Range("C1:AG17").Interior.ColorIndex = 0

'指定年月を取得する
iYear = Cells(1, 1)
iMonth = Cells(2, 1)

'月末を取得する
Getumatu = DateAdd("d", -1, DateAdd("m", 1, CDate(iYear & "/" & iMonth & "/1")))
Matubi = Day(Getumatu)

'カレンダーの曜日と日付を入力する
For i = 1 To Matubi
    strDay = iYear & "/" & iMonth & "/" & i
    Cells(2, 2 + i).Value = Format(CDate(strDay), "aaa")
    Cells(1, 2 + i).Value = strDay
    Cells(1, 2 + i).NumberFormatLocal = "d"

  '3行を結合
    Range(Cells(3, 2 + i), Cells(5, 2 + i)).Merge

    '祝日日を入れる
    For j = 2 To 17
    If CDate(strDay) = CDate(Worksheets("Sheet2").Cells(1 + j, 2)) Then
    '祝日値を代入
    Cells(3, 2 + i).Value = Worksheets("Sheet2").Cells(1 + j, 4)
    '縦書き
    Cells(3, 2 + i).Orientation = xlVertical
    '上揃え
    Cells(3, 2 + i).VerticalAlignment = xlTop
    'フォントサイズ指定(指定する場合は先頭を外す)
    'Cells(3, 2 + i).font.Size = 12
    End If
    Next

Next
Cells.FormatConditions.Delete

'土・日・祝日の背景色を設定する
Range(Cells(1, 3), Cells(17, 33)).FormatConditions.Add Type:=xlExpression, Formula1:= _
"=OR(C$2=""土"",C$2=""日"",C$1=Sheet2!$B$3,C$1=Sheet2!$B$4,C$1=Sheet2!$B$5," & _
"C$1=Sheet2!$B$6,C$1=Sheet2!$B$7,C$1=Sheet2!$B$8,C$1=Sheet2!$B$9,C$1=Sheet2!$B$10," & _
"C$1=Sheet2!$B$11,C$1=Sheet2!$B$12,C$1=Sheet2!$B$13,C$1=Sheet2!$B$14,C$1=Sheet2!$B$15," & _
"C$1=Sheet2!$B$16,C$1=Sheet2!$B$17,C$1=Sheet2!$B$18)"

With Range(Cells(1, 3), Cells(17, 33)).FormatConditions(1).Interior
.PatternColorIndex = xlAutomatic
.ThemeColor = xlThemeColorAccent5
.TintAndShade = 0.599963377788629
End With

'Range(Cells(1, 3), Cells(17, 33)).FormatConditions(1).StopIfTrue = False
End Sub
2桁表示をさせるに・・・・
‘ Right 関数を使用て2桁に揃える方法
Dim num As Integer
num = 5
Right(“0” & num, 2)
‘ Format 関数を使用して2桁に揃える方法
Dim str As String
str = Format(num, “00”)
月や日を2桁にさせるには・・・
‘ Right 関数を使用して出力を2桁に揃える
Right(“0” & Month(Date), 2)
‘ Format 関数を使用して出力を2桁に揃える
Format(Date, “mm”)